


When you want the look of custom furniture but don't have the time, money or maybe the desire to start from scratch, an Ikea hack is the way to go. It's also a good route to take if you like the look of modern furniture mixed with the rustic industrial or hard loft look in home decor.
These rustic cube shelves will take about two to four hours to build and require a medium skill level.
Video of the Day
Things You’ll Need
-
Ikea Kallax shelving unit, 16 1/2 by 57 7/8 inches, 1
-
One-by-fours, knotty pine, 6 feet long, 5
-
3-inch on center cabinet handles, 4
-
1 1/2-inch narrow fixed pin hinges, 8
-
Magnetic catches, 4
-
Wood glue or adhesive
-
1 1/4-inch brad nails, 128
-
Table saw
-
Miter saw
-
Brad nailer
-
Drill and drill bits
-
Measuring tape
-
Sander and sandpaper
-
Hammer and other items for distressing wood
-
Dark walnut stain
-
Foam brush
-
Lint-free rag
-
Oil rubbed bronze spray paint (if necessary)
Step 1: Assemble the Shelving Unit
Assemble the Ikea Kallax shelving unit, following the directions in the box. Set aside.
Step 2: Cut the Door Materials
Measure and cut 16 pieces of one-by-four knotty pine boards to 13 1/16 inches long. (These will make up the door fronts.)


Rip enough (not quite 1 inch) off of four of the door front pieces to create four 1-by-3-by-13 1/16-inch pieces.
 Ripping 1 inch off of four cut pieces Image Credit: Shannon Acheson, AKA Design
Measure and cut an additional eight pieces of one-by-fours to 13 1/16 inches long. (These will be used to fasten the door pieces together.)
Step 3: Assemble the Doors
Lay out three of the 13 1/16 inch pieces from the one-by-four and one 1-by-3-by 13 1/16-inch piece. This will be the front of one door.
Apply glue to two pieces of 13 1/16 inch one-by-four and adhere to door front, lining up the edges and pressing down to affix. See photos.
 Applying adhesive to wood Image Credit: Shannon Acheson, AKA Design
 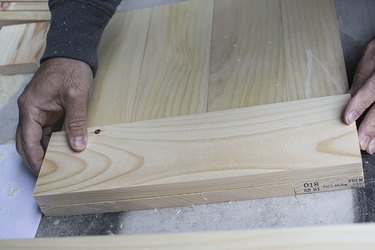 Adhering framing to door Image Credit: Shannon Acheson, AKA Design
Using the brad nailer, also nail it in place.
 Brad nail frame in place as well Image Credit: Shannon Acheson, AKA Design
Repeat for all four doors, alternating the placement of the smaller board (1 by 3 by 13 1/16 inches) for a more rustic, reclaimed look.
 Door Front Image Credit: Shannon Acheson, AKA Design
  Door Back Image Credit: Shannon Acheson, AKA Design
Step 4: Distress the Doors
Using a hammer and screwdriver, distress the door fronts by banging tools onto the wood at all angles. Distress the doors as much or as little as desired.
 Raw distressed wood Image Credit: Shannon Acheson, AKA Design
Sand the edges and fronts of the doors to remove any rough patches.
Apply stain to the doors using the foam brush, making sure the stain sinks into all the dents and grooves. Let it sit for five to 10 minutes. Wipe off the excess stain with a clean, lint-free cloth. Let them all dry fully before moving onto the next step.
 Apply stain with foam brush Image Credit: Shannon Acheson, AKA Design
 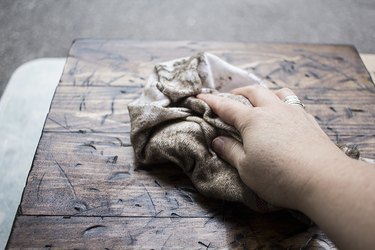 Wipe off excess stain Image Credit: Shannon Acheson, AKA Design
Step 5: Add the Handles and Hinges
After the stain on the wood doors is finished drying, decide which way you want your doors to go (vertically or horizontally). Then, on the front of each door, place a pencil mark at 5 inches and 8 inches from the top of the door. Drill holes for the handle screws.
 Once the stain on the wood doors is finished drying, on front of door mark at 5" and 3" with a pencil. Drill holes for handle screws. Image Credit: Shannon Acheson, AKA Design
  Drill holes for handles Image Credit: Shannon Acheson, AKA Design
Drill 1-inch deep clearance holes in back for the screw heads to fit. Be careful not to drill through to the front of the doors. Add the handles to each door.
 Drill clearance holes in back of doors for screw heads Image Credit: Shannon Acheson, AKA Design
Spray paint the hinges if necessary (it was for me as I couldn't find black or oil-rubbed bronze hinges in the size and style I needed).
Locate one hinge 2 inches from the top and one hinge 2 inches from the bottom of each door on the side opposite the handle. Using screws that came with the hinges, attach the hinges to the doors.
Step 6: Attach the Doors to the Shelving Unit
Place the doors into the shelf openings and mark holes for the hinge screws with a pencil. Drill pilot holes (size appropriate for hinge screws) in the shelving unit and the doors. Attach the doors to the shelving unit by screwing the hinges into place.
Add the magnetic catches as door stops inside the shelving unit.
 Attach Hinges and Handles Image Credit: Shannon Acheson, AKA Design
Finishing Touches
You can customize the cube shelf further by adding hair-pin legs, rigid or swivel casters or some sort of backing to the shelf, such as tread plate or wood planking.
 Inside of shelf display Image Credit: Shannon Acheson, AKA Design
  IKEA KALLAX hack with wood doors finished Image Credit: Shannon Acheson, AKA Design
Have you ever hacked an Ikea piece? What's your favorite Ikea hack?


